
Gatemi Authorize.Net for WooCommerce takes payments through your own Authorize.Net merchant account. It adds three payment methods:
- Credit / Debit Card — the card is turned into a one-time token in the shopper's browser by Authorize.Net's Accept.js, so card numbers never reach your server (PCI-DSS SAQ A-EP).
- eCheck (ACH) — payment from a US bank account.
- Google Pay — at checkout and as an express button on the cart and the top of the checkout.
It is a free plugin with no paid edition.
Requirements
- WordPress 5.6 or later
- PHP 7.4 or later
- WooCommerce 6.0 or later (tested up to 10.7)
- Compatible with High-Performance Order Storage and the Cart and Checkout blocks
- An Authorize.Net merchant account (live) and, for testing, a free sandbox account from
developer.authorize.net - HTTPS on the live site — needed for Accept.js and Google Pay, and so Authorize.Net can deliver webhooks
The header carries Requires Plugins: woocommerce.
1. Install
Gatemi Authorize.Net is coming to wordpress.org. Until it is listed:
- Download the plugin zip.
- Go to Plugins → Add New Plugin → Upload Plugin, choose the zip and press Install Now.
- Press Activate. You are taken to the plugin's settings.
The settings live at WooCommerce → Settings → Payments → Authorize.Net (the Credit / Debit Card gateway), in four tabs: Connection, Credit card, eCheck (ACH) and Google Pay.
2. The four keys, and where each one comes from
Authorize.Net uses four values. You type three; the plugin fetches the fourth.
| Key | What it is for | Where to find it |
|---|---|---|
| API Login ID | Identifies your account to the API | Account → Settings → Security Settings → API Credentials & Keys |
| Transaction Key | The password that goes with it | Same page: New Transaction Key, then Submit |
| Signature Key | Lets your store check that a webhook really came from Authorize.Net | Same page: New Signature Key |
| Public Client Key | Used by Accept.js in the browser | Fetched automatically when you save |
Copy the Transaction Key and the Signature Key as soon as Authorize.Net shows them — it shows each only once. Creating a new one replaces the old one, so any other system using the old key stops working.
3. Sandbox or live
Authorize.Net's sandbox (sandbox.authorize.net) and live account (account.authorize.net) are separate accounts with separate keys. The plugin keeps a set of fields for each, so you can switch without typing them again.
Environment is set to Sandbox on a fresh install, so nothing real is charged while you set up. Switch it to Live when you are ready to take payments (see step 9). A store that has already saved the screen keeps the environment it chose.
4. Connect
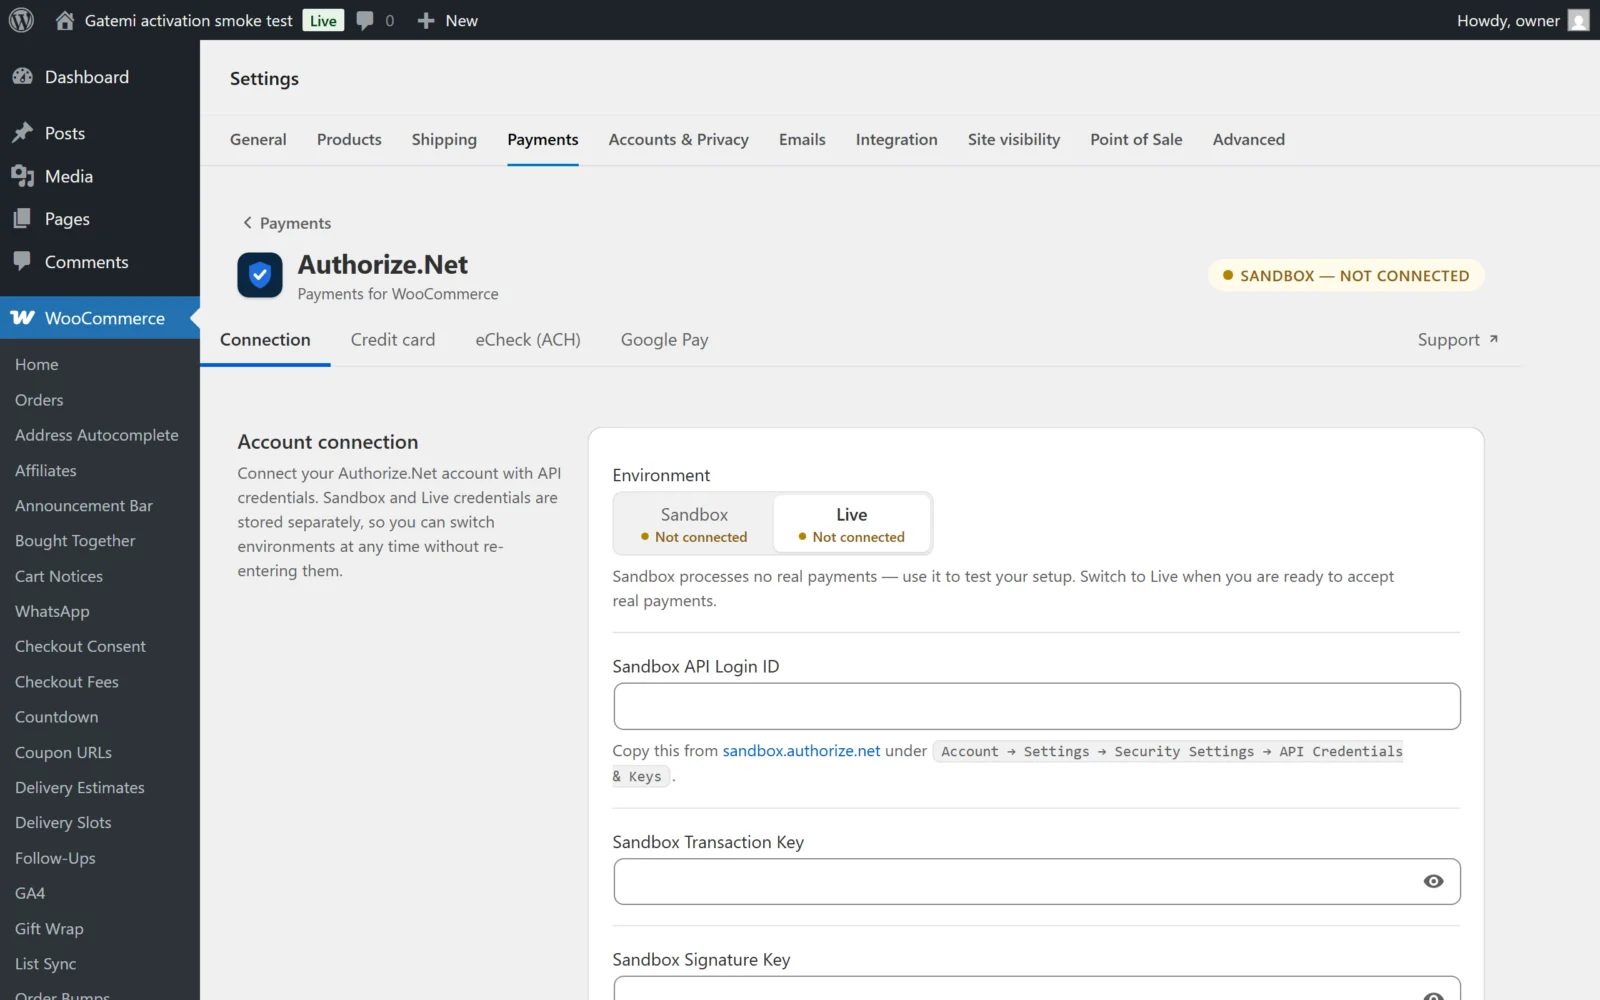
- Open the Connection tab.
- Under Environment, choose Sandbox.
- Paste Sandbox API Login ID, Sandbox Transaction Key and Sandbox Signature Key.
- Press Save changes.
When you save, the plugin:
- Refuses a partial set — all three values are required for the environment you are editing.
- Checks the API Login ID and Transaction Key with Authorize.Net (
getMerchantDetailsRequest) and refuses invalid ones. If Authorize.Net cannot be reached, the keys are saved and you are told they could not be verified. - Reads your Public Client Key and your Google Pay Gateway ID from the same answer and stores them.
- Registers a webhook with Authorize.Net (see below).
The badge at the top no longer reads Sandbox — Not connected, and the Environment switch shows Sandbox as Connected.
If the Public Client Key is missing
If your account has never had one, a notice says the plugin could not retrieve it. In Authorize.Net go to Account → Settings → Security Settings → Manage Public Client Key, create one, then press Save changes again. Without it the card form cannot tokenize a card.
5. Webhooks
You do not need to create the webhook by hand. Each successful save registers one for your site's /wp-json/gatemi-authnet/v1/webhook, using the REST webhooks API, subscribed to:
net.authorize.payment.authcapture.creatednet.authorize.payment.priorAuthCapture.creatednet.authorize.payment.void.creatednet.authorize.payment.refund.creatednet.authorize.payment.fraud.approvednet.authorize.payment.fraud.declinednet.authorize.customer.deletednet.authorize.customer.paymentProfile.deleted
These are exactly the events the plugin acts on. The webhook id is stored per environment. If one exists already, later saves bring its event list into line with this one. You can see it in Authorize.Net under Account → Settings → Webhooks.
Every webhook is checked against your Signature Key (HMAC-SHA512). Without a Signature Key for the current environment, every webhook is refused. Authorize.Net cannot reach a local site such as localhost; payments still work there, but fraud-review results and refunds made in Authorize.Net will not reach your orders.
6. Set up the card method
On the Credit card tab:
- Enable Credit / Debit Card is on by default.
- Choose Transaction type: Authorize and capture (the default) or Authorize only.
- Switch on Saved cards if customers should be able to save cards — it is required for WooCommerce Subscriptions.
See Settings for eCheck and Google Pay.
7. Set up what Authorize.Net needs
- eCheck (ACH) must be enabled on your Authorize.Net account before you switch it on here.
- Google Pay must be enabled under Account → Digital Payment Solutions in Authorize.Net. For live payments you also need a Google Pay merchant ID from the Google Pay & Wallet Console; leave it empty in sandbox.
- Your Fraud Detection Suite filters decide which payments are held for review; the plugin follows their decision.
8. Take a test payment
- In sandbox, add a product to the cart and go to the checkout.
- Choose Credit / Debit Card and use an Authorize.Net sandbox test card (for example
4111 1111 1111 1111), any future expiry and any CVV. - Place the order. With Authorize and capture it becomes Processing.
- Open the order: the transaction id is on it, and the transaction appears in your sandbox account under Transaction Search.
- Refund the full order from WooCommerce's Refund button. An unsettled sandbox transaction is voided; see How it works.
9. Go live
- On Connection, switch Environment to Live.
- Paste the Live API Login ID, Transaction Key and Signature Key from
account.authorize.netand save. The live Client Key, Gateway ID and webhook are set up the same way. - Make a small real purchase and refund it the next day, after settlement.